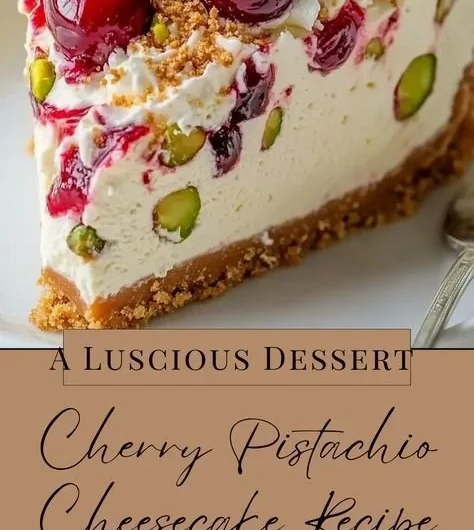
A Cozy Cherry Pistachio Cheesecake Recipe
As the days grow shorter and the air turns crisp, I find myself craving those comforting treats that feel like a warm hug on a chilly evening. One such delight that never fails to bring a smile to my face is Cherry Pistachio Cheesecake. The rich creaminess of the cheesecake is perfectly balanced with the tart juiciness of fresh cherries and the nutty warmth of pistachios. It’s a little piece of indulgence that not only satisfies your sweet tooth but also warms the heart.
Whenever I make this cheesecake, I’m reminded of family gatherings filled with laughter and joy. Picture this: an elegant dessert gracing the table, the glaze of cherry juice glistening in the candlelight. It’s the ultimate centerpiece for celebrations or simply a cozy night in with loved ones. Trust me; this recipe is one you’ll definitely want to pin for later!
Why You’ll Love This Recipe
- Decadent Yet Easy: This Cherry Pistachio Cheesecake is surprisingly simple to make, perfect for both seasoned bakers and newbies alike.
- Delightful Flavor Combination: The creamy cheesecake blended with the sweetness of cherries and the earthy pistachio paste creates a beautifully harmonious flavor that’s irresistible.
- Impressive Presentation: With its vibrant cherry topping and luscious texture, this dessert will wow your guests and make any gathering feel special.
- Perfectly Shareable: This recipe yields enough to serve a crowd! It’s a great way to spread joy at family gatherings or brunch parties.
- Make-Ahead Friendly: This cheesecake gets even better after a night in the fridge, allowing the flavors to meld beautifully. It’s perfect for those busy weeks when you want to plan ahead.
What You’ll Need
Gather these simple ingredients to create your Cherry Pistachio Cheesecake:
- 1 1/2 cups graham cracker crumbs
- 1/2 cup unsalted butter, melted
- 2 cups cream cheese, softened
- 1 cup powdered sugar
- 1 cup sour cream
- 1/2 cup pistachio paste or finely ground pistachios
- 3 large eggs
- 1 teaspoon vanilla extract
- 2 cups cherries, pitted and halved
- 1/4 cup sugar
- 1 tablespoon lemon juice
Let’s Make It Together
Now, let’s dive into the step-by-step instructions to create your dreamy Cherry Pistachio Cheesecake:
Preheat your oven to 325°F (160°C). In a bowl, combine graham cracker crumbs and melted butter, then press into the bottom of a 9-inch springform pan to form the crust. Bake for 10 minutes, then let cool.
In a large mixing bowl, beat the cream cheese until smooth. Gradually add the powdered sugar, sour cream, and pistachio paste, mixing until well combined.
Add the eggs one at a time, mixing well after each addition. Stir in the vanilla extract.
Pour the cheesecake filling over the cooled crust and smooth the top.
Bake for 50-60 minutes or until the center is set but still slightly jiggly. Turn off the oven and let the cheesecake cool inside for an hour.
In a saucepan, combine the cherries, sugar, and lemon juice. Cook over medium heat until the cherries release their juices and the mixture thickens slightly. Let cool.
Once the cheesecake is completely cooled, spread the cherry mixture on top. Refrigerate for at least 4 hours or overnight before serving.
Variations & Creative Twists
- Nutty Swaps: If pistachios aren’t your favorite, try almond or hazelnut paste for a different nutty flavor.
- Fruit Fusions: Swap cherries for blueberries or raspberries for a delightful berry cheesecake twist.
- Chocolate Lovers: Drizzle a chocolate ganache over the cherry topping for an indulgent touch that will satisfy any chocolate craving!
- Zesty Citrus: Add a hint of orange zest to the cherry mixture for a fresh, bright flavor that elevates the entire dessert.
Chef Emma’s Helpful Tips
- Plan Ahead: This cheesecake can be made a day in advance, making it a perfect option for holidays or special gatherings.
- Slice with Ease: For clean cuts, run your knife under hot water before slicing, then wipe it dry.
- Storing: Store leftovers in an airtight container in the refrigerator for up to five days. It also freezes beautifully if you need to prepare it for a later date. Just thaw overnight in the fridge.
- Ingredient Swaps: For a lighter cheesecake, you can use low-fat cream cheese and Greek yogurt instead of sour cream.
What’s Inside – Nutrition Breakdown
This recipe serves approximately 12 people. Here’s a quick look at what’s inside:
- Serving Size: 1 slice
- Calories: 320
- Carbohydrates: 32g
- Sugar: 22g
- Fat: 20g
- Protein: 5g
- Sodium: 150mg
Frequently Asked Questions
Can I make this ahead?
Absolutely! It’s best to make the cheesecake a day in advance for optimal flavor and texture.
Can I use different ingredients?
Certainly! Feel free to substitute different nuts or fruits based on your preference.
How do I store leftovers?
Store any leftover cheesecake in an airtight container in the fridge for up to five days.
How long does it last?
If frozen, it can last up to three months; just remember to thaw it in the fridge before serving.
Final Thoughts
This Cherry Pistachio Cheesecake is more than just a dessert; it’s a delightful way to create new memories and cherish old ones. Every bite is filled with warmth, flavor, and a sense of home. So, gather your loved ones around, slice yourself a generous piece, and savor the deliciousness together. Save this Cherry Pistachio Cheesecake to your “Cozy Treats” board so it’s ready when you need a sweet escape!
Cozy Cherry Pistachio Cheesecake
- Total Time: 80 minutes
- Yield: 12 servings 1x
- Diet: Vegetarian
Description
A delightful Cherry Pistachio Cheesecake that combines creamy cheesecake with tart cherries and nutty pistachios, perfect for family gatherings or cozy nights in.
Ingredients
- 1 1/2 cups graham cracker crumbs
- 1/2 cup unsalted butter, melted
- 2 cups cream cheese, softened
- 1 cup powdered sugar
- 1 cup sour cream
- 1/2 cup pistachio paste or finely ground pistachios
- 3 large eggs
- 1 teaspoon vanilla extract
- 2 cups cherries, pitted and halved
- 1/4 cup sugar
- 1 tablespoon lemon juice
Instructions
- Preheat your oven to 325°F (160°C). In a bowl, combine graham cracker crumbs and melted butter, then press into the bottom of a 9-inch springform pan to form the crust. Bake for 10 minutes, then let cool.
- Beat the cream cheese until smooth. Gradually add the powdered sugar, sour cream, and pistachio paste, mixing until well combined.
- Add the eggs one at a time, mixing well after each addition. Stir in the vanilla extract.
- Pour the cheesecake filling over the cooled crust and smooth the top.
- Bake for 50-60 minutes or until the center is set but still slightly jiggly. Turn off the oven and let the cheesecake cool inside for an hour.
- Combine the cherries, sugar, and lemon juice in a saucepan. Cook over medium heat until the cherries release their juices and the mixture thickens slightly. Let cool.
- Once the cheesecake is completely cooled, spread the cherry mixture on top. Refrigerate for at least 4 hours or overnight before serving.
Notes
For a lighter cheesecake, use low-fat cream cheese and Greek yogurt instead of sour cream. Store leftovers in an airtight container for up to five days.
- Prep Time: 20 minutes
- Cook Time: 60 minutes
- Category: Dessert
- Method: Baking
- Cuisine: American
Nutrition
- Serving Size: 1 slice
- Calories: 320
- Sugar: 22g
- Sodium: 150mg
- Fat: 20g
- Saturated Fat: 10g
- Unsaturated Fat: 7g
- Trans Fat: 0g
- Carbohydrates: 32g
- Fiber: 1g
- Protein: 5g
- Cholesterol: 70mg